FAQs
To apply a promo or discount code:
• Proceed to checkout and enter your code in the ['Discount Code'] field.
• Click ['Apply'] to see your new total before finalizing your order.
• Only one code can be used per order.
If you’re having trouble entering your promo code, please try clearing the cache on your web browser or trying on a different device.
We Make Backyard BBQ Better!
Grill Masters Club is America’s #1 grilling & BBQ subscription box. Each month, our team of certified pitmasters curates a unique themed box of 5+ premium barbecue sauces, dry rubs, seasonings, condiments, grilling tools, and other grilling surprises. Each box includes a printed booklet with recipes and grilling pro tips for using the products. Monthly, bi-monthly or quarterly deliveries are available.
Although our primary product is the subscription box ("The Ultimate BBQ Experience"), we also stock a full line of small-batch rubs, BBQ sauces, marinades, condiments, hot sauces, and grilling fuels available as one-time purchases. We're talking premium, award-winning products from American BBQ brands you won't find in your local supermarket. We also stock premium grilling & smoking accessories.
If you aren't interested in a subscription, browse our one-time purchases in the Pitmaster Shop.
Want more information on our subscription options? Check out our HOW IT WORKS page.
Want to give the gift of BBQ? It’s easy with a gift subscription to The Ultimate BBQ Experience from Grill Masters Club!
Our subscription box is a “can’t miss” present for any holiday or occasion that will make you a gift-giving hero: Valentine’s Day, Father’s Day, Christmas, birthdays, graduations, housewarming gifts, corporate BBQ gifts and more. Digital and print-and-fold Gift Notification Cards are also available.
Subscription FAQs
Each themed BBQ subscription box is a carefully curated collection of 5+ premium grilling and BBQ products, including barbecue sauces, dry rubs, marinades, spices, BBQ tools and other grilling surprises we know you’ll love.
Our team of pitmasters takes the time to research, taste test, and vet every supplier and product we feature. If the product isn’t up to our standards, it simply won’t be in the box!
Remember to scan the QR code inside your box to unlock the full experience, including bonus recipes, grilling tips, video content, and exclusive deals and discounts from the suppliers.
You can choose to receive your subscription box every month, every 2 months (bi-monthly) or every 3 months (quarterly).
Non-subscription orders ship same or next weekday!
Tip: See the current status of monthly shipments on our Box Status page.
Your first box ships within 72 hours. Subsequent boxes will ship on or around the 9th or 23rd of the following month, depending on when your first box ships.
Subscription orders received from the 1st to 15th of each month get placed in the batch of orders ("Batch A") that process on the first of subsequent months and ship between the 7-9th.
Subscription orders received from the 16th – 31st of each month get placed in the batch of orders ("Batch B") that process on the 15th of subsequent months and ship on or around the 22nd of the month.
Boxes arrive at their destination 2-5 days after the tracking number was generated. Please note that boxes ship from our fulfillment center in Texas.
Once your box has been packed and assigned a shipping label, you’ll be notified via email when it ships. This will include tracking information so you can monitor the status of your delivery.
Click here to subscribe for yourself or click here to give a subscription as a gift.
The Ultimate BBQ Experience is a monthly subscription and subscriptions are set to automatically renew. However, you can pause or cancel your subscription at any time by logging in to your account or by submitting a support request.
Depending on when your subscription was ordered, automatic renewals (recurring billing) occur on the 1st or 15th of the month after your subscription’s final box has shipped. This means your card will be charged on the 1st or 15th if your subscription is set to automatically renew.
Simply put, if you’re a month-to-month subscriber, you’ll be billed monthly. If you purchase a 3-month auto-renewing subscription, you’ll be billed every three months.
To change the automatic renewal settings for your subscription, log in to your account or email [email protected] for assistance.
Here are examples of what you can expect:
Example #1: On July 3rd, you purchase a month-to-month subscription set to automatically renew. Your first box will ship within 72 hours; on August 1, the payment method saved in your account will be charged to automatically renew your monthly subscription so you can receive a box that will ship August 8.
Example #2: On November 16th, you purchase a 3-month subscription set to automatically renew. Your first box will ship within 72 hours; your second box will ship on December 23; your third box will ship on January 23. On February 15, your credit card will be re-billed for a 3-month subscription. The first box from your new subscription will ship February 23
Example #3:On May 9, you purchase a 6 month subscription set to automatically renew. Your first box will ship within 72 hours; your second box will ship on June 8; your remaining boxes will all ship on the 8th of each month. Your final box will ship October 8. On November 1, your credit card will be re-billed for a 6-month subscription. The first box from your new subscription will ship November 8.
You can change the renewal settings for your subscription at any time. Simply log in to your account or email [email protected].
To cancel your Grill Masters Club subscription, log in to your subscription dashboard here.
- After logging in, click "Manage Subscriptions" or "Manage this subscription"
- Click "Cancel subscription" at the bottom and continue through the steps
Alternatively, you can contact our member services specialists directly by emailing [email protected]. We can assist with cancelation requests, ensuring you will no longer be charged and your subscription will end after the last scheduled box is sent. Please note that subscriptions automatically renew, so action may be needed on your part to prevent reneals if you do not wish to continue.
We also offer a variety of options if you're interested in keeping your subscription active instead of canceling! Options include:
- Applying a credit to your account
- Pausing your subscription
- Switching to a different delivery frequency
If you choose to cancel, we are ready to support you at every step and refund any unshipped boxes where applicable.
Additionally, we can offer an exclusive promo code valid on your next subscription purchase, ensuring great BBQ experiences continue at a reduced price!
Order FAQs
Yes, you can track the delivery of your order! We provide a tracking number via email for each shipment when your order ships, which you can use to monitor the delivery progress. You can also find tracking numbers by logging into your account.
You'll also receive "Out for Delivery" email notifications to keep you in the loop.
Stay updated on the whereabouts of your shipment and let us know if there are any issues with your delivery by emailing [email protected].
If you've placed an order and it has not yet been fulfilled (you have not received a tracking number) and need to change the shipping address, we can assist with updating this information.
Please email [email protected] with the correct address and your order number, and we will make the necessary updates to ensure your orders are delivered to the right location.
Once the update is made, all future boxes will be shipped and delivered to the new address. You will receive a confirmation from us once this change has been processed.
Please note that we cannot redirect or update the address once a shipping label has been assigned to your order. If this is the case, please email [email protected] and we'll do our best to assist!
We sincerely apologize for any inconvenience if your order arrived damaged or incomplete.
If you've received a damaged item or an item is missing, we will reship the item to you. For instance, if your box has a sauced that leaked during shipping, we'll send you a replacement at no charge!
If your order was a gift and the box was affected, just let us know and we can ship a fresh box so you can give a clean, presentable gift.
Email [email protected] and let us know about your issue. Please snap a photo of the damage for our internal quality assurance purposes.
Shipping FAQs
We offer fast and free shipping for orders over $100 within the contiguous United States.
All subscription boxes ship for free to US customers.
Select bundles (marked with an orange 'FREE US SHIPPING" badge) also ship for free to US customers.
Orders shipped outside the United States are subject to taxes and duties that are paid for by the customer.
Delivery times vary depending on the destination and the shipping method selected. We ship from our warehouse in Texas.
• Standard Delivery: Typically arrives within 2-4 business days via USPS. Larger bundles may be shipped via UPS.
• International Delivery: Typically arrives within 14-21 business days.
Yes, we do offer expedited shipping for domestic, non-subscription orders. Your expedited shipping options will be displayed during checkout and are based on the weight and size of your order, as well as the destination (we ship from our warehouse in Texas).
Please keep in mind that the order processing can take up to 24 hours. Typically, we do our best to ship same or next business day.
Yes! We can ship subscription orders and one-time purchases internationally. All international shipments ship via DHL, with the customer responsible for taxes and duties (DDU).
International Subscription Shipping
International shipping for subscription boxes is $42.99 per box.
Shipping for One-time Purchases
The international shipping rates for non-subscription orders is calculated at checkout, based on the weight and dimensions of the order and the destination. Enter your shipping address at checkout to calculate shipping fees.
PLEASE NOTE: We DO NOT offer refunds or replacements for damaged or undelivered boxes shipped outside of the United States.
While we appreciate every international customer, please remember that shipments are made at your own risk. Grill Masters Club cannot be held responsible or liable if the box arrives damaged, or doesn’t arrive at all. That said, we are working to improve the experience for international members, and hope to offer more options in the future.
Gifting FAQs
If you're giving a gift, we make it easy to send your gift recipient a digital or print-and-fold "Gift Notification Card" that you can send or give to them before their gift is delivered.
Visit our Gift Notification Card page to explore print and digital versions to send to your gift recipient.
Father’s Day, anniversaries, birthdays, congrats, thank you versions and more are available!
Partnership FAQs
Absolutely! We love partnering with American BBQ brands of all sizes.
If you’d like to see your product and company featured in a Grill Masters Club subscription box or available for purchase in our Pitmaster Shop, you’ll need to send us samples for tasting and provide wholesale information.
Please email [email protected] to learn more.
Absolutely! We’re always on the lookout for opportunities to work with content creators on all types of content — from video collaborations to guest posts on our blog and more.
Follow us on Instagram and Facebook to see some of our content collaborators in action.
If you have a piece of content you’d like featured on GrillMastersClub.com and promoted on our social media accounts, please review our UGC Terms and email the content to [email protected].
For more information about content collaborations, please email [email protected] or contact us on social media.
Yes, if you’d like to promote Grill Masters Club and earn commissions on your sales then you should apply to our affiliate program!
To apply to or learn more, visit our our Affiliate Program page.
Grilling & Smoking Questions
This article comes from our guide on "How to Slice Brisket Properly"
Are you a barbecue enthusiast looking to master the art of cutting brisket? Look no further! This article will guide you through the process step-by-step, ensuring that you achieve perfectly sliced brisket every time. Whether you're hosting a backyard cookout or simply want to impress your family and friends with your culinary skills, knowing how to cut brisket properly is essential.
Overview
- Remember to choose the right brisket, ensuring it's well-marbled and of good quality.
- Preparing the brisket by trimming excess fat and seasoning it properly will also contribute to a better cutting experience.
- When it comes to making the first cut, it's crucial to identify the grain of the meat and cut against it to maximize tenderness.
- Slicing the brisket against the grain ensures that each bite is easy to chew and packed with flavor.
- Lastly, remember to use a sharp knife and take your time to ensure clean and even cuts.
To properly prepare the brisket for slicing, it's important to ensure it has rested adequately. After cooking the brisket, it's essential to let it rest for at least for at least an hour, but up to 3 or 4 to enjoy the juiciest results (we recommend using The Meat Swadl to rest your smoked meats!).
This resting period allows the juices to redistribute throughout the meat, making it juicier and more tender. You can place the brisket on a cutting board and cover it loosely with aluminum foil to help retain the heat.
This resting time also allows the internal temperature of the brisket to even out, ensuring that it's cooked evenly and reducing the risk of overcooking or drying out the meat.
Once the brisket has rested, it's time to prepare it for slicing. Start by removing any excess fat from the surface of the brisket. You can use a sharp knife to carefully trim off any thick or tough layers of fat. However, be careful not to remove too much fat, as it adds flavor and moisture to the meat.
Next, determine the direction of the grain of the brisket. The grain refers to the lines of muscle fibers running through the meat. It's crucial to cut against the grain to ensure tender slices. You can identify the grain by looking for the lines that run parallel to each other.
Identifying the Grain and Making the First Cut
Once the brisket has had sufficient resting time, it's time to identify the grain and make the initial slice.
Begin by examining the brisket and looking for the lines of muscle fibers. These lines indicate the direction of the grain. The grain is important to identify because cutting against it can result in chewy and tough slices.
To make the first cut, position the brisket with the fat side facing up and locate the point where the flat and point muscles meet. This is where you will start slicing.
Using a sharp knife, make a shallow cut across the grain to create a guide for the rest of your slices. This initial cut will help you maintain consistency in the thickness of your slices.
Once the guide cut is made, start slicing the brisket against the grain, using smooth and steady strokes. It's important to keep your knife sharp to ensure clean cuts. Remember to cut across the grain with each slice to achieve tender and flavorful pieces of brisket.
By identifying the grain and making the first cut correctly, you will be on your way to serving mouthwatering slices of brisket to your eager guests.
Slicing Against the Grain for Tenderness
Slicing against the grain ensures that each tender and flavorful piece of brisket melts in your mouth. When you look closely at a piece of brisket, you'll notice that there are long, stringy fibers running through it. These fibers are the grain of the meat, and cutting against them helps to break them up, resulting in a more tender and enjoyable eating experience.
To slice against the grain, start by identifying the direction in which the fibers are running. They usually run lengthwise, so you'll want to cut perpendicular to that direction. This means that if the fibers are running from left to right, you'll want to cut from top to bottom. By doing so, you'll be cutting across the fibers, making them shorter and easier to chew.
To achieve the best results, it's important to use a sharp knife and make clean, even cuts. Take your time and slice slowly, allowing the knife to do the work. If you rush or use a dull knife, you may end up tearing the meat and disrupting the natural texture.
It's also important to note that the thickness of your slices can affect the tenderness of the brisket. Thinner slices will be more tender, while thicker slices may require more chewing. Experiment with different thicknesses to find the perfect balance for your taste.
Overall, slicing against the grain is a simple but crucial step in cutting brisket. It ensures that each bite is tender, flavorful, and a true delight for your taste buds.
This article comes from our "Guide to Prepare the Ultimate Party Wings"
Want to learn how to section wings by separating flats from the drums? Adding this skill to your BBQ tool belt will save you money, and yield bigger and better wings! These bonus grilling tips below will take your wing to the next level!
Tools & Ingredients
- Whole Chicken Wings
- Sharp, Heavy Knife
- Nitrile Gloves
- Cutting Board
Instructions
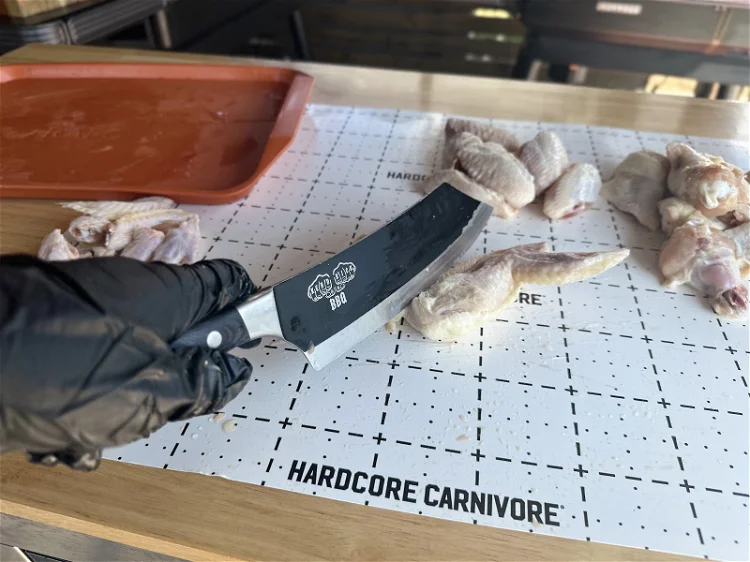
The first step is making sure you have a very sharp knife with some weight to it.
The second step is making sure you have a very clean surface area to work with, and preferably gloves.
Use fresh or thawed wings, never attempt this frozen!
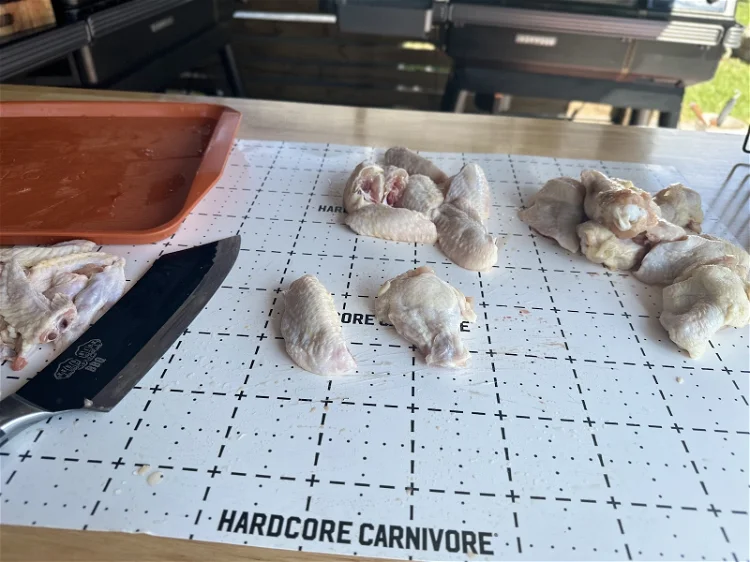
Each wing gets separated individually, and it’s going to take a few tries to get it right if this is your first time. However, once you get the hang of it, it’s a lot less time-consuming than you think!
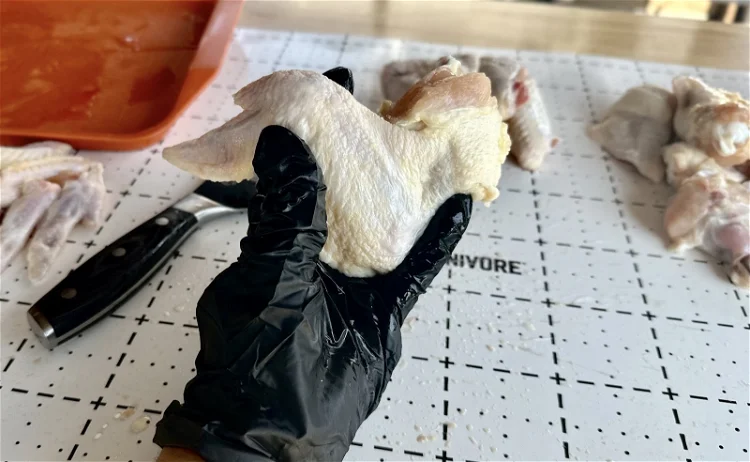
Place full wing on a clean surface area, preferably on a plastic cutting board that can’t slip.
Stretch the wing out, until you are able to see where the bottom of the drum meets the bottom of the flat. (See photo for reference).
Using your knife, you’re going to cut (with force) diagonally to split the two sections apart. It’s important to find that exact meeting point so that you are not cutting into any bone that could split and become harmful. we like to use our finger to figure out where that spot is.
After you separate the wingette from the drumette, I like to cut the extra tip off the wing to make a traditional flat.
5 Tips for Better Chicken Wings
Pat dry with paper towel, and apply a thin binder like a spray oil before seasoning with your preferred dry rub.
Sprinkle cornstarch on all sides when seasoning to make crispier skin!
When smoking wings, smoke at a low temperature (we like 220 F) and spritz with oil or water throughout cook to avoid drying out. Finish them off at 275 F to ignite the juices.
When grilling wings hot and fast, grill for 10 minutes each each to avoid sticking when flipping.
After tossing the wings in your favorite small-batch sauce from Grill Masters Club, place them back on the grill to tack up and keep their crispy skin!
This article comes from our Complete Guide to Seasoning a Blackstone or Flat Top Griddle
Have you recently purchased a Blackstone or flat top griddle and are wondering how to season it? You’ve come to the right place! Seasoning your grill is an important step in ensuring that your food comes out tasting great.
Cleaning And Preparation
Cleaning and preparing a Blackstone Grill is an important step in seasoning it properly. It's best to start by cleaning the griddle top with a mild dish soap and warm water. Make sure to scrub off any excess grease or residue before rinsing it off with clean water. Once the griddle has been cleaned, use a paper towel to dry it completely.
Next, you’ll need to heat up the griddle until it’s hot. Turn up the heat until it reaches 350-400°F, then let it sit for about 10 minutes. This will help open up the pores of the metal so that oil can penetrate better during seasoning. After that, turn off the heat and let it cool down for at least an hour before you proceed with seasoning your grill.
Tools Needed For Seasoning
Now that your Blackstone Grill is cleaned and prepared, it's time to season it. To get the best results, you'll need a few tools. Firstly, you'll need vegetable oil. Make sure to use a light oil such as canola or vegetable oil for the best taste. Next, you'll need paper towels or rags for rubbing the oil into the griddle. Finally, you'll need some heat-resistant gloves to protect your hands from the hot griddle surface. All these items should be easily available at any home improvement store.
Once all the tools are gathered and your grill is prepped, it's time to get seasoning! Rub down the entire griddle with a thin layer of vegetable oil using either paper towels or rags and then turn on the heat to medium-high. Let your Blackstone Grill cook for about 30 minutes before turning off the heat and allowing it to cool completely. The griddle should now be seasoned and ready for cooking!
Applying Oil To The Griddle
Before you begin to season a Blackstone grill, it's important to oil the grate. This will help prevent food from sticking and allow for easy cleaning. To apply oil, start by heating up the grill on high heat for 15 minutes. Then, turn off the heat and use a paper towel or brush to coat the grates with cooking oil. Be sure to spread it evenly across the entire surface of the grates. Lastly, turn on heat again for an additional 10 minutes. This will help lock in the oil and create a non-stick surface. Seasoning your Blackstone grill is now complete!
Heating Up The Griddle
Next, it's time to get the grill hot and ready for cooking. Begin by preheating your Blackstone Grill on high heat for 15 minutes with the lid closed. This will burn off any residue from the oil application, as well as prepare your grates for a nice sear on whatever you decide to grill.
Once preheated, turn down the heat to the temperature that you desire. Depending on what type of food you're cooking, a lower or higher heat may be necessary. Keep in mind that when using a Blackstone Grill, you'll want to cook at a medium-high temperature rather than high because the grates are closer to the flame. When finished, simply turn the burners off and allow your grill to cool down before cleaning or storing it away.
Seasoning After Cooking
Once you've cooked your first meal on the Blackstone Grill, it is important to season it afterwards. This will help prevent rust and keep your grill looking good for years to come. To do this, turn off the heat and let the surface cool completely. Then, use a cloth or paper towel to wipe down the grates with cooking oil. You want to make sure that all surfaces are covered in an even layer of oil. Once you've done this, heat up the grill again and let it burn off any excess oil. This should take about 10-15 minutes. Finally, turn off the heat and let the grill cool before storing away or using again. With proper care and maintenance, your Blackstone Grill should last you many years of delicious meals!
Benefits Of Seasoning A Flat Top
The benefits of seasoning a Blackstone Grill are plentiful. Seasoning helps to create a non-stick surface, prevent rust and corrosion, and add flavor to your food. Seasoning also helps to season the metal, which in turn will help maintain the longevity of the grill. Additionally, it will make cleanup much easier since food won’t stick as easily.
Seasoning your Blackstone Grill is easy and doesn’t require much time or effort. All you need is a high heat cooking oil such as vegetable or canola oil and a paper towel or cloth. Simply coat the grates with a thin layer of oil, then use the paper towel or cloth to spread it evenly over all surfaces that come into contact with food. Once you’re done, fire up the grill for about 10 minutes. This will help burn off any excess oil and season the metal of your Blackstone Grill. Doing this every few months will ensure that your grill works optimally and remains in great condition for years to come.
Maintenance Tips for Your Flat Top Griddle
It's important to properly maintain your Blackstone Grill to ensure that it lasts for years to come. Start by cleaning the grill after each use. Remove any debris or excess grease from the grates and heat plates while they are still warm. Then, brush or scrape away any residue with a wire brush or scraper. Make sure to also clean and wipe down the control panel and exterior surfaces of the grill.
You'll want to season your Blackstone Grill every couple of months. First, preheat the grill for 15 minutes on high heat without food inside. Then, turn off the burners and let it cool before using a paper towel to apply a thin layer of oil onto all of the surfaces, including grates and heat plates. This will help protect them from rust and create a non-stick surface that will make cooking easier in the future.
Are you looking for an easy way to cook your favorite meals outdoors? Flat top grills are the perfect tool for grilling, sautéing and even baking! This complete guide will show you everything you need to know about flat top grills so that you can get cooking.
Flat top grills have been gaining popularity over the last few years as a versatile outdoor cooking appliance. From burgers and steaks to pancakes and eggs, these grills can do it all with ease. Plus, their design makes them simple to clean up afterwards - no more scrubbing away at individual grill plates after meals!
And if you're worried about taste, don't be. With flat top grills, food is cooked evenly on both sides, ensuring every meal comes out juicy and delicious every time. Ready to learn how to use this amazing piece of equipment? Read on for our complete guide to flat top grills!
Flat Top Grills
A flat top grill is a type of cooking equipment that can be used to cook a variety of dishes. It's composed of a large, flat metal surface which is heated by either gas or electric heat sources. Flat top grills are popular because they provide even heating and allow you to cook with minimal fat as the grease and other juices immediately evaporate off the hot plate. Additionally, it allows for quick clean-up after each meal since there aren't any crevasses or grooves like on traditional grills where food can get stuck.
This guide will explain everything you need to know about buying and using your own flat top grill: from types and sizes, to accessories and maintenance tips. With this information in hand, you'll be able to make sure you purchase the right one for your needs and use it safely so that you can enjoy delicious meals cooked on your very own flat top grill!
Flat Top Grill Benefits
Flat top grills offer many benefits that make them the perfect choice for any outdoor cooking. Firstly, their even heating surface makes it easy to cook a variety of ingredients at once without having to worry about hotspots or burning food. Secondly, they are incredibly durable and can stand up against some of the toughest elements due to their construction materials - making them suitable for both residential and commercial use.
Here are three great reasons why you should consider investing in a flat top grill:
- Versatility – You can cook everything from burgers and steaks to vegetables and seafood with ease on your flat top grill.
- Easy Cleanup – Unlike traditional charcoal grills, there’s no need to scrape off charred bits after each use as most models come with removable trays that allow for quick cleanup.
- Efficiency – Flat top grills heat up quickly and evenly so you don’t have to waste time waiting for the perfect temperature before adding your ingredients.
Whether you're looking for an upgrade from your current grill or want something new entirely, a flat top grill is definitely worth considering! With its versatility, durability, and efficiency, this type of cooker offers plenty of advantages compared to other options on the market today.
Types Of Flat Top Grills
There are many different types of flat top grills available on the market, each with its own set of advantages and disadvantages. The most common type is an electric flat top grill, which uses electricity to provide heat for cooking. This type of grill is relatively easy to use, as it does not require any charcoal or gas fuel. It also provides a more even temperature across the entire surface area of the cooking plate.
The next type of flat top grill is a propane-fueled version. Propane-fueled models offer greater control over heat levels and cook times than electric versions do, making them ideal for large outdoor parties. They typically come in larger sizes than electric models and can be used to cook several dishes at once. However, they do require propane tank refills every few months depending on usage.
In terms of cost, electric flat top grills tend to be cheaper than their counterparts fueled by propane or natural gas; however, they often don’t reach the higher temperatures necessary for some recipes like searing steaks or achieving that perfect charbroiled flavor from burgers and hot dogs. Ultimately, choosing between these two types comes down to personal preference and how much you're willing to invest upfront for your backyard barbecuing needs.
Flat Top Fuel Source Options
There are three primary forms that you can use to power your grill: gas, electric or charcoal.
- Gas powered flat top grills are very efficient and generally easy to operate. They produce a steady heat output, allowing for precise temperature control during cooking. Additionally, they don't require preheating like other fuel sources do.
- Electric grills offer convenience as many models plug into standard outlets without any additional special equipment required. However, electric versions may not be able to reach as high temperatures as their gas counterparts due to wattage limitations with some models.
- Charcoal powered grills create an intense flavor but require more effort in terms of preparation and clean up than either gas or electric varieties do. Charcoal is also less predictable when it comes to controlling the heat level on your grill because the amount of charcoal used affects the intensity of the fire produced by it significantly.
All these factors should be taken into consideration when selecting the right type of fuel source for your specific needs before making a purchase decision so that you can ensure optimal performance from your new flat top grill!
Selecting The Right Size Grill
When selecting the right size flat top grill, it's important to consider how much food you'll be cooking and how often. If you plan on regularly hosting large gatherings or parties with lots of hungry guests, then a larger model is best for you. On the other hand, if your grilling needs are more modest, a smaller grill should suffice.
Size isn't the only factor to consider when choosing a flat top grill either; look into the BTU rating as well. This will tell you how quickly and evenly your food will cook depending on its power. Don’t forget about extra features like side burners and temperature control too - these can make all the difference in achieving perfectly cooked results every time. So take some time to research which type of flat top grill works best for your grilling style and budget before making a decision.
Seasoning Your Flat Top Grill
Now that you’ve chosen the right size flat top grill, it's time to season it. Seasoning your flat top grill is an important step in protecting its surface and making sure food doesn't stick when cooking. To begin seasoning your flat top grill, make sure it's clean of any dirt or debris before beginning. Use a degreaser to remove grease from the grilling surfaces. Once the surface has been cleaned, apply a thin layer of oil over the entire area using either a paper towel or brush. When finished, preheat your stovetop for at least 15 minutes on medium-high heat. This will help cook off any excess moisture left behind from cleaning and ensure even distribution of oil across the griddle plate. After this process is complete, turn off the flame and wipe away any access oil with a dry cloth or paper towel. Your new flat top grill should now be seasoned and ready for use!
Cleaning And Maintenance Tips For Flat Top Grills
Maintaining your flat top grill is an important part of keeping it in good working condition. To keep the griddle clean and functioning properly, always make sure to scrape off any food residue after each use with a metal spatula or scraper. Next, you should always apply oil on the griddle before cooking - this will help prevent sticking and create even heat distribution. Afterward, let the surface cool down then wipe away excess grease and oils with a damp cloth or paper towel.
To maintain your flat top grill's longevity, it's important to regularly season it. This involves applying oil while heating up the entire surface, which helps protect against rusting or staining over time. Additionally, check for wear and tear such as dents or scratches often. If needed, replace parts like burners or knobs that have become damaged due to regular use. Taking these steps will ensure your flat top grill is safe for cooking and provides delicious results for many years to come!
Cooking Techniques On A Flat Top Grill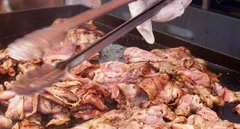
Cooking on a flat top grill is an art form. It requires precision, timing and practice to achieve the perfect results. The key lies in mastering the heat control of the flat top grill which involves understanding when and how much heat should be applied. There are various techniques employed for cooking including searing, grilling, steaming and sautéing.
Searing involves quickly browning food over high heat and sealing in juices, flavor and moisture. This technique can be used for fish, steak or vegetables. Grilling uses direct heat from below with no fat added to cook foods such as burgers or hot dogs. Steaming cooks food using steam generated from boiling liquid underneath it while sautéing is a method that combines both dry and wet cooking methods where food is cooked quickly in oil over medium-high heat. All these techniques require different levels of heat so it’s important to understand each one before attempting them on your flat top grill. With practice you will soon become proficient at mastering the art of cooking on your flat top grill!
Common Mistakes To Avoid
When using a flat top grill, there are some common mistakes that should be avoided to ensure the best results. To start, it's important not to overheat the griddle or place cold food on a hot one; this can cause sticking and burning of foods. Additionally, never leave food unattended while cooking as flames may occur unexpectedly.
It’s also essential to use oil or other fats when cooking with the griddle. This will help prevent sticking and create a more consistent texture in cooked foods. Furthermore, make sure to clean up any spills right away so they don't burn onto the surface of your grill. Finally, always allow for enough space between each piece of food you're cooking–crowding can lead to unevenly cooked dishes.
Safety Tips For Using A Flat Top Grill
Now that you know common mistakes to avoid, let's focus on how to stay safe while using a flat top grill. Before lighting the flame, check for any gas leaks and make sure all connections are secure. Always keep combustible items away from the area surrounding your grill. Once it is lit, never leave it unattended as flames can spread quickly if not monitored carefully. In addition, use long-handled tools when cooking with fire for extra safety.
When finished grilling, always turn off the heat source first before turning off the propane tank valve. Letting the heat die out gradually will help ensure there are no flare ups due to residual gas in the line. Be sure to also clean up properly after usage so nothing flammable remains near your grill during storage. Taking these precautions will help prevent accidents and keep everyone safe when enjoying delicious grilled meals!
Troubleshooting Common Issues
Troubleshooting common issues with flat top grills can be an intimidating task, but it doesn’t have to be. Start by checking the basics: is the grill plugged in and switched on? Is there a gas leak or blockage present? If everything looks good here, turn your attention to the temperature settings. Make sure that they are set correctly; if not, adjust them accordingly.
Next, inspect the burners for any debris which may be clogging them up. This could lead to uneven heating and potential flare-ups. Clean out any debris you find and make sure all burner caps are secure and positioned properly. Finally, check for loose connections between the regulator and propane tank as these often cause problems when not secured tightly enough. With basic troubleshooting steps like these, most flat top grill issues should be resolved quickly and easily without needing professional help!
Accessories For Your Flat Top Grill
When it comes to flat top grills, there are plenty of accessories you can use to help make your cooking experience smoother and more enjoyable. From spatulas and scrapers for flipping food items to racks for holding lids or placing multiple dishes on the grill surface, these tools will help take your outdoor meal prep from ordinary to extraordinary. Here’s a look at some must-have accessories that work with all types of flat top grills.
| Accessory | Use | Benefit |
| Spatula & Scraper | Flipping food items; Cleaning off the cooktop surface | Easier control over delicate foods; Keep the cooktop clean and free of residue buildup. |
| Lid Rack | Placing lid onto the cooktop while not in use; Multiple lid placement options available (wall mount, freestanding) | Keeps lids safe and secure when not in use; Allows multiple lids to be organized together conveniently. |
| Griddle Plate & Grill Rack System | Cooking multiple dishes simultaneously without crowding the grill surface area; Creating individualized heating zones for different types of food items being cooked at once. | Maximize efficiency by using two different heat sources at once; Cook two separate meals side-by-side without overcrowding the space.|
These simple yet effective accessories should certainly come in handy when preparing delicious meals outdoors! Whether you need something to keep your lid safe or want an easier way to flip delicate foods, one of these tools is sure to do the trick. Investing in quality flat top grill accessories is a great way to get maximum enjoyment out of your favorite outdoor culinary ventures!
Best Grills On The Market
Choosing the right flat top grill for your needs can be tricky. There are many different models and brands, each with their own unique features that provide specific benefits. To help you find the right one, here's a list of some of the best grills on the market:
* Char-Broil Commercial Double Header - This two burner model offers an impressive total BTU output of 36,000 and is made from durable stainless steel components. It also has folding side shelves and heavy duty casters for easy maneuvering.
* Weber Summit S-460 Grill - Featuring four burners and 48,800 BTUs in total power output, this premium model is great for large gatherings and backyard barbecues. The cooking surface area measures 646 square inches, making it perfect for feeding big groups. Plus, it has LED illuminated knobs so you can easily adjust settings even after sunset or during light rain showers.
* Blaze LTE 32 Inch Built In Propane Gas Grill - With four commercial grade 304 stainless steel burners offering up to 60,000 BTUs of heat across its 756 square inch cooking surface area, this top of the line built-in gas grill provides plenty of room to cook multiple dishes at once without sacrificing quality control over results.
No matter what type or size of flat top grill you decide to buy, make sure you do your research beforehand so that you get the most out of your purchase. Consider factors such as size requirements (e.g., space available), budget constraints (e.g., whether splurging on a high end brand is worth it) as well as fuel source preferences (propane versus natural gas). That way when it comes time to barbecue with friends and family everyone will be happy knowing they're enjoying meals cooked on reliable equipment!
Cost Considerations
When shopping for a flat top grill, cost is an important factor to consider. Depending on the features and size of the model you choose, grills can range from $50 to several thousand dollars. Knowing what your budget is before purchasing will help you narrow down your options.
The amount of money you want to spend should depend on how often you plan on using the grill and the type of food items you intend to prepare with it. If you are just looking for something basic that will heat up quickly and get the job done, then opting for an inexpensive option might make more sense than splurging on one with all the bells and whistles. On the other hand, if you are looking for something that offers additional features such as multiple burners or a side burner, then spending extra might be worth it in order to have everything you need right at your fingertips. Additionally, bigger grills tend to require more maintenance because they take longer to clean due to their larger surface area.
No matter which option you go with, remember that investing in good quality products now can save time and money in the long run since they will last much longer than cheaply made models.
Flat top grills are incredibly versatile and can be used for a variety of cooking styles. They're also easy to store, so you don't have to worry about taking up too much space in your kitchen or outdoor area. It's important to season the grill before each use, as this will help preserve its flavor and prevent food from sticking. When it comes to choosing between electric and gas models, consider how often you plan on using the grill and what type of fuel is available in your area. Lastly, remember that regular cleaning is key for preventing buildup and keeping your grill in good shape. With proper care and maintenance, your flat top grill will provide years of delicious meals!
When it comes to storing flat top grills, there are a few things you need to consider. First off, temperature is key. You don't want your grill in an area that's too hot or cold as this could damage the metal and cause rusting. Secondly, cover the grill when not in use with a weatherproof tarp or some other type of protective covering – this will protect against rain and snow which can also lead to corrosion. Lastly, make sure your grill is stored properly on level ground; anything out of balance could be dangerous for anyone who uses the grill later on.
Fortunately, these steps aren’t hard to follow - but they’re essential if you want your flat top grill to last longer than expected. Taking proper care of it now means less maintenance down the road. So take the time to invest in good storage practices today and enjoy delicious meals from your trusty flat top for years to come!
When it comes to grilling, seasonings can make a huge difference in the flavor of food. As such, many people wonder if seasoning is necessary before each use of their flat top grill.
The answer is yes - seasoning your flat top grill on a regular basis will ensure that you get the most out of its performance and enjoy flavorful meals every time.
Seasoning helps to protect against rust and corrosion as well as reduce sticking. It also aids in creating a beautiful non-stick surface for easy clean up after cooking your favorite recipes.
To properly season your flat top grill, first brush off any loose debris from the cooking surface with a soft bristled brush then coat the entire surface with an even layer of vegetable oil or lard using a paper towel or cloth rag.
Heat the flat top over medium heat until all surfaces are hot, turn off the heat source and let cool completely before wiping away any excess oil or fat residue left behind. Doing this regularly will help keep your flat top grill performing at its best while providing delicious tasting foods for years to come!
Cleaning a flat top grill regularly is essential for keeping it in good condition.
After each use:
While it’s still warm (but not super hot):
Use a metal scraper or spatula to push food debris and grease into the grease trap.
Wipe it down:
Grab some paper towels or a rag and wipe away remaining bits.
Deglaze if needed:
Pour a little water on the surface (or use a squirt bottle) to help loosen stubborn stuck-on bits. Scrape again.
Oil it lightly:
Once clean and dry, apply a thin layer of cooking oil (like flaxseed, canola, or vegetable oil) to prevent rust.
At least once every two months, deeper cleaning should be performed on your flat top:
Heat it up slightly:
Warm the griddle just enough to loosen gunk, then turn it off.
Scrub with grill stone or chainmail scrubber:
Use a griddle cleaning brick or heavy-duty scrub pad with a bit of water or vinegar.
Wipe it clean:
Rinse with water (carefully) and wipe dry with paper towels or rags.
Re-season if needed:
If you removed seasoning during the deep clean, add 2–3 thin layers of oil and heat it until it smokes to rebuild the non-stick layer.
Things to Avoid:
Soap: Dish soap can strip seasoning unless you’re planning to re-season right after.
Abrasive tools on cold griddle: Can scratch or damage the surface.